Setting up the Cross-Compiler
You can find more information in the official website.
The computer the compiler runs on is called the host, and the computer the new programs run on is called the target. When the host and target are the same type of machine, the compiler is a native compiler. When the host and target are different, the compiler is a cross compiler. So why do we use cross-compilation? Sometimes target’s processors are too slow to compile kernel with and the process would take too long.
We will create our workspace for the project, in the home folder, with the following commands
userk@dopamine:~$ cd && mkdir RaspberryPi && cd RaspberryPi
userk@dopamine:~/RaspberryPi$
In order to install the cross-compiler we need to download the latest version of Buildroot from the official website and untar the compressed file.
Now it’s time to configure the downloaded tool and compile it. Two options:
Using a basic pre-configured version
Newbie Level
userk@dopamine:~/RaspberryPi/buildroot-2013.11$ sudo make raspberrypi_defconfig
For manual configuration see infos at the bottom of the page. Now compile the sources with:
userk@dopamine:~/RaspberryPi/buildroot-2013.11$sudo makeIf a blu window shows up, just exit pressing ESC and type again the previous command.
It’s going to take a while. When the compilation ends verify that the toolchain has been correctly installed by displaying the version of the arm-linux-gcc file in the /usr/local/cross-rpi/usr/bin/ folder.
userk@dopamine:~/RaspberryPi/buildroot-2013.11$ /usr/local/cross-rpi/usr/bin/arm-linux-gcc -v
Using built-in specs.
COLLECT_GCC=/usr/local/cross-rpi/usr/bin/arm-linux-gcc
COLLECT_LTO_WRAPPER=/usr/local/cross-rpi/usr/libexec/gcc/arm-buildroot-linux-uclibcgnueabi/4.7.3/lto-wrapper
Target: arm-buildroot-linux-uclibcgnueabi
[...]
Thread model: posix
gcc version 4.7.3 (Buildroot 2013.11)
userk@dopamine:~/RaspberryPi/buildroot-2013.11$ cd ..
And check the content of the output/images folder, it should be:
userk@dopamine:~/RaspberryPi/buildroot-2013.11$ tree output/images
output/images
├── rootfs.tar
├── rpi-firmware
│ ├── bootcode.bin
│ ├── cmdline.txt
│ ├── config.txt
│ ├── fixup_cd.dat
│ ├── fixup.dat
│ ├── fixup_x.dat
│ ├── start_cd.elf
│ ├── start.elf
│ └── start_x.elf
└── zImage
If something went wrong, you can clean the configuration files and delete all the downloaded file with the sudo make clean command.
Done! Ok, pretty easy so far, but this is just a basic configuration. If you want to test the system, jump to the extraction of the filesystem image in the Root partition. Or continue to personalize your distribution adding packages and features.
Configure it manually
Hard Core Level
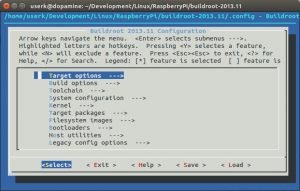
Buildroot has a nice configuration tool similar to the one you can find in the Linux kernel. Note that there is no need to be root to configure and use Buildroot. The first step is to run the configuration assistant with:
userk@dopamine:~/RaspberryPi/buildroot-2013.11$ sudo make menuconfig
The following window will appear.
You need to specify a few fields in this configuration tool. Starting from the Target Options section, the target architecture family to build for, the CPU variant, the Application Binary Interface to use and the version of kernel header files you wish to use. The main settings are reported below.
- Target Options
- Target Architecture: ARM (little endian)
- Target Architecture Variant: arm1176jzf-s
- Target ABI: EABI
- Floating point strategy: VFPv2
- ARM instruction set: ARM
- Build Options
- Host Dir: $(BASE_DIR)/host
- Toolchain
- Toolchain type: Buildroot toolchain
- Kernel Headers: Linux 3.10.X kernel headers
You must select the correct set of header files to match the kernel you intend to use on your target system. Default option 3.6.11
- C libary: uClibc
This option selects the C library for the cross-compilation toolchain. That option worked for me.
- uClibc C library Version: uClibc 0.9.33.X
- GCC compiler Version: Choose yours, mine was the 4.7.X
- Enable C++ support
- System Configuration
- (Kasuga) System hostname
- (Welcome to Kasuga) System banner
- Root password: pitos (Choose your own).
Buildroot prevents you with this message:
│ WARNING! WARNING!
│ Although pretty strong, MD5 is now an old hash function, and
│ suffers from some weaknesses, which makes it susceptible to attacks.
│ It is showing its age, so this root password should not be trusted
│ to properly secure any product that can be shipped to the wide,
│ hostile world.
- Kernel
press y to build a Linux kernel for your embedded device
- Kernel version: (Custom Git repository)
(git://github.com/raspberrypi/linux.git) URL of custom repository
- Custom repository version: 1587f77
- Kernel configuration: Using a defconfig
- Defconfig name: bcmrpi_quick
- Kernel binary format: zImage
- Target Packages
- <y>Show packages that are also provided by busybox
- Compressor and decompressors:
- bzip2
- Debugging, profiling and benchmark
- dmalloc
- iozone
- lsof
- memstat
- ramspeed
- stress
- Development tools
- binutils
- binutils binaries
- make
- pkgconf
- git
- Hardware handling
- i2c-tools
- iostat
- lm-sensors
- sensors
- sensors-detect
- Miscellaneous
- mcrypt
- Network application
- openssh
- vsftpd
- Package managers
- ipkg
- opkg
- gnupg support
- rpm
- support for bzip2 payloads
- support for xz payloads
- Shell and utilities
- sudo
- time
- System tools
- cpuload
- Text editors and viewers
- vim
- install runtime
- Filesystem images
- tar the root filesystem: y
The compilation requires an internet connection to download different packages specified in the configuration step. Start the compilation with
userk@dopamine:~/RaspberryPi/buildroot-2013.11$ sudo make
The make command will generally perform the following steps:
- download source files (as required);
- configure, build and install the cross-compilation toolchain, or simply import an external toolchain;
- configure, build and install selected target packages;
- build a kernel image, if selected;
- build a bootloader image, if selected;
- create a root filesystem in selected formats.


