

Setting up the Cross-Compiler
You can find more information in the official website.
The computer the compiler runs on is called the host, and the computer the new programs run on is called the target. When the host and target are the same type of machine, the compiler is a native compiler. When the host and target are different, the compiler is a cross compiler. So why do we use cross-compilation? Sometimes target’s processors are too slow to compile kernel with and the process would take too long.
But what is it all about? In short, Buildroot simplifies the process of building a complete Linux system for an embedded system, using cross-compilation. It is able to generate a cross-compilation toolchain, a root filesystem, a Linux kernel image and a bootloader for your target, which is, in our case, the Raspberry Pi.
We will create our workspace for the project, in the home folder, with the following commands
userk@dopamine:~$ cd && mkdir RaspberryPi && cd RaspberryPi
userk@dopamine:~/RaspberryPi$
In order to install the cross-compiler we need to download the latest version of Buildroot from the official website and untar the compressed file.
Now it’s time to configure the downloaded tool and compile it.
Buildroot has a nice configuration tool similar to the one you can find in the Linux kernel. Note that there is no need to be root to configure and use Buildroot. Since the Buildroot team has prepared a configuration file for the Raspberry Pi, we will use it as a starting point. Please check the steps they have written in ‘buildroot-2014.11/board/raspberrypi/readme.txt’.
userk@dopamine:~/RaspberryPi/buildroot-2014.11$ sudo make ARCH=arm help | grep raspberrypi
  raspberrypi_defconfig               - Build for raspberrypi
userk@dopamine:~/RaspberryPi/buildroot-2014.11$ sudo make raspberrypi_defconfig
The next step is to run the configuration assistant with:
userk@dopamine:~/RaspberryPi/buildroot-2014.11$ sudo make menuconfig
The following window will appear.
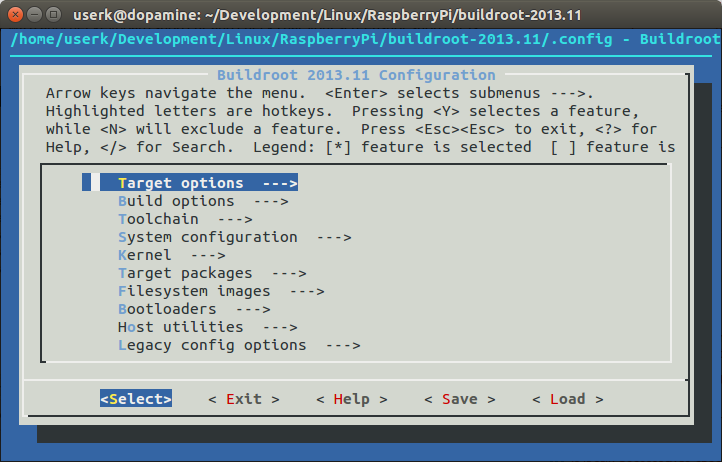
You need to modify a few fields in this configuration tool. Starting from the header files we wish to use in order to patch the kernel with the Adeos and Xenomai patch and few utilities. The main settings are reported below.
- Toolchain
- Toolchain type: Buildroot toolchain
- Kernel Headers: (Manually specified Linux version)
(3.8.13) linux version - Custom kernel headers series (3.8.x)
- System Configuration
- (x3n0B0mb) System hostname
- (Welcome to x3n0B0mb) System banner
- Root password: pitos
- Kernel (press y to build a Linux kernel for your embedded device)
- Kernel version: (Custom Git repository
- (git://github.com/raspberrypi/linux.git) URL of custom repository
- (d996a1b) Custom repository version
- Kernel configuration (Using a defconfig)
(bcmrpi_quick) Defconfig name - Kernel binary format: zImage
- Target Packages
- <y>Show packages that are also provided by busybox
- Compressor and decompressors:
- bzip2
- Debugging, profiling and benchmark
- dmalloc
- iozone
- lsof
- memstat
- ramspeed
- Development tools
- binutils
- binutils binaries
- git
- make
- grep
- tar
- tree
- Hardware handling
- i2c-tools
- iostat
- Interpreter languages and scripting
- python3
- Miscellaneous
- mcrypt
- Package managers
- opkg
- gnupg support
- Networking applications
- openssh
- vsftpd
- wget
- iputils
- netstat-nat if you want to displays a list of open sockets
- Real-Time
- Install testsuite
- Native skin library (NEW)
- POSIX skin library (NEW)
- Shell and utilities
- bash
- sudo
- System tools
- cpuload
- kmod and utilities to handle kernel modules
- Text editors and viewers
- vim
- install runtime
The compilation requires an internet connection to download different packages specified in the configuration step. Start the compilation with
userk@dopamine:~/RaspberryPi/buildroot-2014.11$ sudo make
The make command will generally perform the following steps:
- download source files (as required);
- configure, build and install the cross-compilation toolchain, or simply import an external toolchain;
- configure, build and install selected target packages;
- build a kernel image, if selected;
- build a bootloader image, if selected;
- create a root filesystem in selected formats.
Prepare the Root partition
userk@dopamine:~/RaspberryPi/buildroot-2014.11$ ls output/images/
rootfs.ext2  rootfs.ext4  rootfs.tar
userk@dopamine:~/RaspberryPi/buildroot-2014.11$ cd /media/$USER/Root/ && ls
lost+found
The Root partition contains only the lost&found file. Now extract the rootfs.tar.
userk@dopamine:/media/userk/Root$ sudo tar -xvf /home/$USER/RaspberryPi/buildroot-2014.11/output/images/rootfs.tar
userk@dopamine:/media/userk/Root$ ls
bin  etc   lib    linuxrc     media  opt   root  sbin  tmp  var
dev  home  lib32  lost+found  mnt    proc  run   sys   usr
Prepare the Boot partition
* bootcode.bin
* config.txt
* fixup.dat
* start.elf
* zImage
userk@dopamine: /media/userk/Root$ cd ~/RaspberryPi/buildroot-2014.11/output/images
userk@dopamine:~/RaspberryPi/buildroot-2014.11/output/images$ sudo cp rpi-firmware/* /media/$USER/Boot/
userk@dopamine:~/RaspberryPi/buildroot-2014.11/output/images$ sudo cp zImage /media/$USER/Boot/zImage
Usually the kernel image name is kernel.img. It has been defined as zImage in the config.txt file.
Ok, we now have our fresh filesystem, the bootloader and the kernel image! We are ready to run our minimal distribution on the Raspberry Pi. Insert the micro SD in the model B+ board and login as root and pitos password!